# OI Runtime
# OI Embedded Runtime
OI Embedded runtime includes a complete operating system installed on a system card within the screen. This runtime handles configuration for hardware devices, networking, and firmware updates.
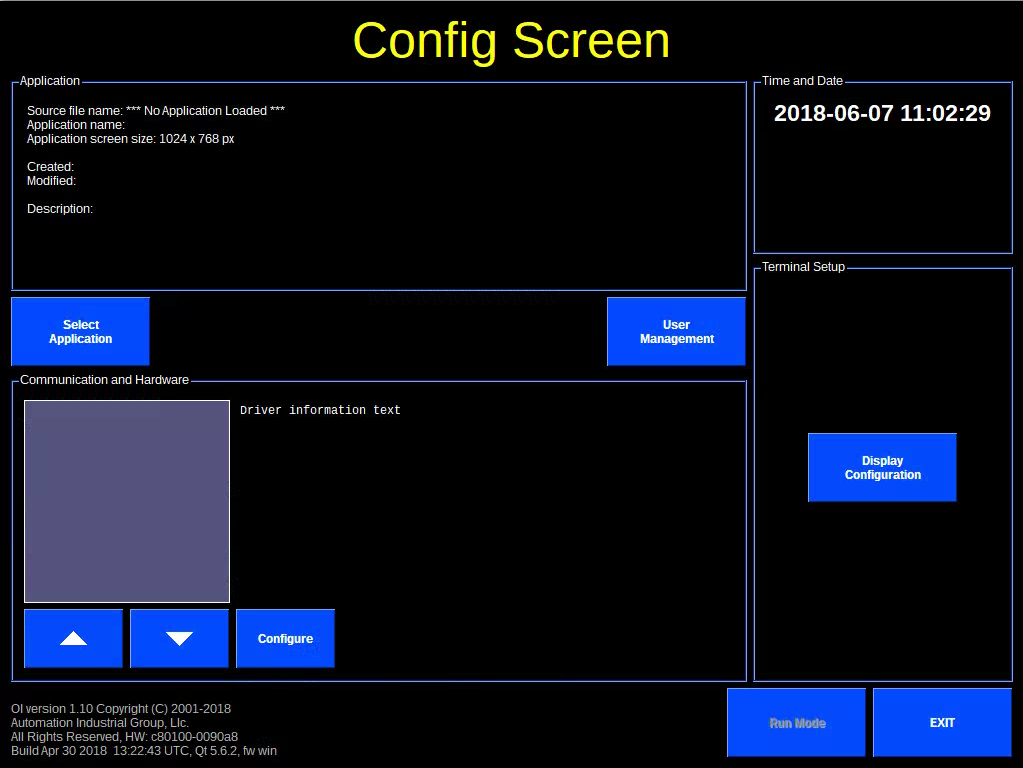
# OI Windows Runtime
OI Windows runtime includes configuration tools for the OI Application. The system is configured through the standard windows interfaces.
# Apps & Files
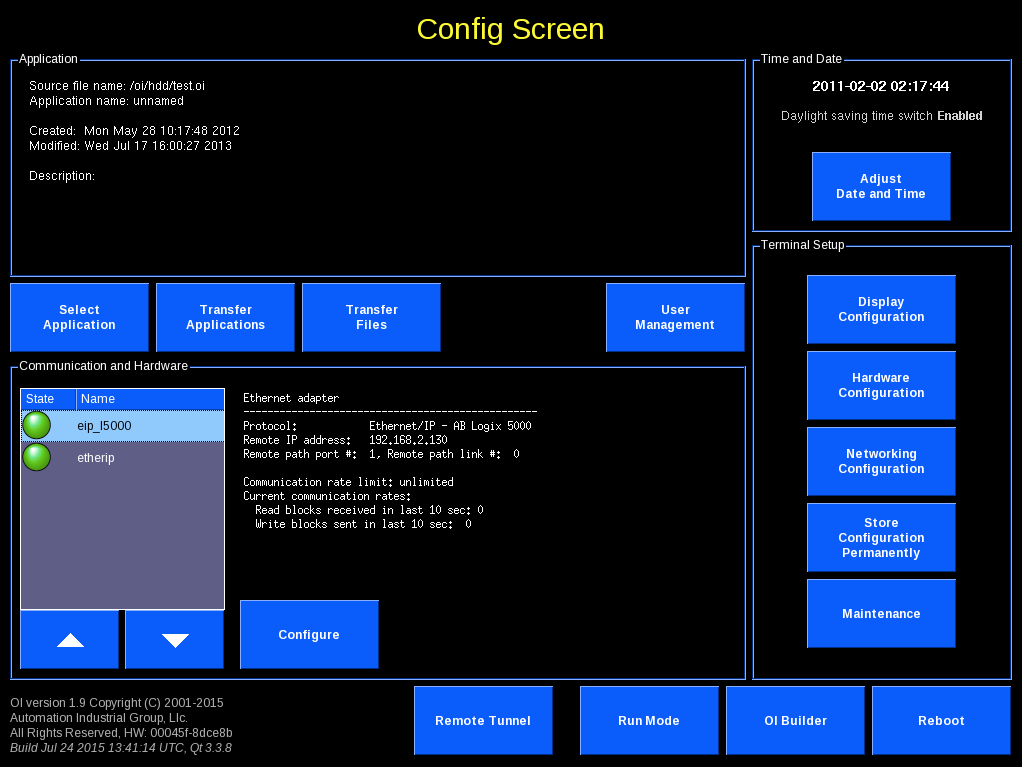
# Select Application
Select application to run.
# Transfer Applications
Transfer applications using USB. Transferring an application will also transfer all related application files.
# Transfer Files
Transfer files using USB. This transfers files individually which is useful for transferring PDFs and videos.
Note
Harddrive contents are accessible through the "hdd" folder. Only the contents of the harddrive's "oidata" folder are displayed. To access other files you will need to use FTP to transfer from the "/media/hdd" folder.
Note
Files are filtered in the transfer dialogs:
- Transfer Applications: *.oi
- Transfer Files: *.txt; *.dat; *.pdf; *.avi; *.mpg; *.mpeg; screen_*.png; *.csv; *logo*.png; *.wmv
Directories are not filtered so they can be copied to and from USB Flash using Read from Flash and Write to Flash buttons. Even if content of directory is filtered, it is copied as it is present on HD.
# User Management
OI Supports access controls through a central User Management system. The system stores a CSV file, oiusers.csv, with user credentials. See the User Access manual for more information.
TIP
You can FTP this file across multiple OI screens to keep access privileges up to date.
Users can log in using username and password, or using an RFID badge.
::: note AIG recommends and can provide RFIdeas Virtual Com readers. :::
WARNING
RFID readers that attach as keyboards are not compatible with the user access system.
# Adjust Date and Time
Adjust date and time for the system.
Note
OI-Windows uses Window's settings
# Error Message
System error messages, such as lost communications or script errors, are displayed on a red banner at the top of the screen. The bar can be collapsed to help see parts of the screen it may be obscuring.
# Terminal Setup
The following actions can be taken from these areas.
# Display Configuration
Set screensaver, power management, touchpad, and VNC settings.
# Screensaver
The screensaver can be configured to start from 1 to 99 minutes of idle.
Note
The screensaver can be turned off using a bit from the PLC. In OIB under Application->Settings->Control Tags, set a tag for the Hide Screen Saver field. A change on this tag's value will turn the screensaver off (acting like somebody touched the screen).
# Power Management
The display can be configured to turn off from 1 minute up to 3 hours 59 minutes.
# Touchpad
Utility to re-calibrate touchpad. Contact AIG for password.
Utility to disable touchpad input.
Note
This feature is available in OI versions 1.11 Dec 2020 and newer.
WARNING
Disabling touchpad will require an alternate input device to re-enable the touchpad or otherwise use OI such as a USB mouse or VNC connection. This feature is provided due to some environments not suitable for capacitive touchpads.
# VNC
Sets password for VNC (remote screen viewing) access.
# Hardware Status and Configuration
Tools to view hardware status and format data cards or hard drive.
Note
To format Data Cards, insert a USB stick into one of the USB ports, go to the Storage Tab, and press the "Format as Data Card." The USB stick will be formatted, and the OI screen rebooted.
WARNING
Format hard drive capability is provided for troubleshooting or recovery and should be used with caution. Data can be permanently erased.
Note
OI-Windows uses Window's settings
# Networking Configuration
Set network settings and network services for the OI screen. See Network Configuration for more information.
Note
OI-Windows uses Window's settings
# Store Configuration Permanently
OI does not store changes to the system until this button is pressed. This is meant to extend the lifetime of the system card, and provides a way to test changes.
Note
OI-Windows operates on the internal SSD drive and relies on Windows own system to manage life-span on SSD devices.
# Maintenance
Maintenance provides tools to backup, restore, and upgrade firmware. A USB flash drive must be inserted for these functions to work.
# Backup
To backup, insert a USB stick into one of the USB ports, open the Maintenance->Backup screen, select the settings to back up, and press backup.
Backup is in a form of single file with .oibak extension (internally .tar.gz)
Internally OI uses this command to backup the system: tar -cv -f - /tmp/archive.info [parameters] | gzip - > backupname.oibak && sync
tmp/archive.info file includes the following information about the archive: - date and time of creation - creator firmware version - archive content
The following parts of system are added to the archive based on the selections in the backup dialog:
- System configuration: /tmp/config/ directory and all subdirectories
- Defined users: /pdf/oiusers.csv
- Currently running application: /oi/somedir/currapp.oi /oi/somedir/currapp___*
- Application related data (*.csv): /oi/appdata/*.csv (filter including all subdirectories of /oi)
- All applications: /oi/*.oi and /oi/*___* (filter including all subdirectories of /oi)
- All modules: /oi/modules/ directory and all subdirectories
- All pdfs: /pdf/*.pdf (filter including all subdirectories of /oi)
- All videos: /pdf/*.mpg /pdf/*.mpeg /pdf/*.avi /pdf/*.wmv (filter including all subdirectories of /oi)
# Restore
Insert a USB stick with a prior backup on it into one of the USB ports, open the Maintenance->Restore screen, and then restore.
TIP
You can use the verify tool to make sure the settings are valid.
Immediately after an archive file is selected the tmp/archive.info file is extracted and information about the selected archive is displayed to the user. The tmp/archive.info file is extracted using the command: zcat /flash/somedir/archivename.oibak | tar -C / -xf - tmp/archive.info
The archive can be verified using verify button. To verify the following command is used: zcat /flash/somedir/archivename.oibak | tar -t
The archive can be restored using restore button. To restore the following commands are used:
- echo "tmp/config/sysconfig\ntmp/config/*.cal\ntmp/config/tpaneld.conf" > /tmp/config/exclude.list; zcat /flash/somedir/archivename.oibak |
- tar -X /tmp/config/exclude.list -C / -xf - && sync; rm -f /tmp/config/exclude.list
If any of commands returns nonzero value an error message is displayed to the user - contact AIG if this procedure fails.
WARNING
Warning: During restore nothing of current content of OI is deleted - only files from archive are extracted. If file with the same name and location exists it is overridden. This is valid for all files except files related to Touch Controller settings (/tmp/config/sysconfig, /tmp/config/*.cal, /tmp/config/tpaneld.conf). This exception was added on 2009-04-07
# Firmware Upgrade
See Firmware Upgrade
# Remote Tunnel
This opens a VPN link to Automation IG's service server to provide remote support if necessary. Please contact AIG for configuration information.
Note
OI-Windows uses Window's settings
# Run Mode
Runs the selected application.
# OI Builder
Opens the selected application in OIBuilder. When OIBuilder is exited, the application is reloaded.
Note
OI-Windows screens must Exit, then open OIBuilder manually.
# Reboot
Reboots the screen.
Note
OI-Windows screens are rebooted by using Windows OS interface.
← Networking Screens →